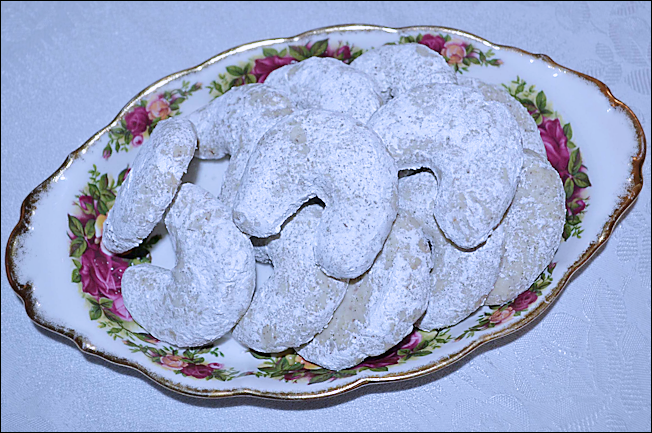
Tag-Archive for ◊ powdered sugar ◊

08 Mar 2014 Kipferls (Vanilla Hazelnut Butter Cookies)

kipferl2

I had never, ever heard of Kipferls before.  Then, in two weeks they came into my life twice!  First, my friend Priscilla made some in the Culinary School Pastry Arts program she is enrolled in. I didn’t try one because I don’t like nuts.  I dislike nuts so much that the name of the cookie didn’t even register.  Then I read “The Book Thief” and Kipferls are important in one chapter.  Since I was hosting book club this month and since the author had contributed his mother’s recipe for Kipferls to “The Book Club Cookbook” that my friend Kayte  gave me for my birthday last year, I decided to make the cookie. I had to do a Google image search to see what they looked like! Then came the hunt for Hazelnut Flour.  It’s out there. I found it at Sprouts.  I was shocked by the price.  I told the cashier that there must have been a mistake.  She said she doubted it.  I asked her to call for a manager for a price check.  YEP.  She was right.  There was no mistake.  It’s $16.95 for a 14 oz. packet of Hazelnut Flour (aka Hazelnut Meal). After creating such a fuss, and with my book club in less than seven hours, I bought the dangblasted expensive and pitifully small bag of Hazelnut Flour. BTW, you don’t have to buy this flour to make these cookies.

How to avoid using expensive Hazelnut Flour:

1. Make your own.  Preheat oven to 350°F. Place 6 ounces (1 1/4 cups) of shelled hazelnuts on a baking sheet in a single layer. Bake 8–10 minutes, stirring occasionally until the hazelnuts are fragrant and brown. Remove the nuts from the  oven and let cool slightly. While still warm, though, fold the nuts inside a clean kitchen towel and rub vigorously to remove their skins. Place skinned nuts in a food processor fitted with the stainless-steel blade, and process until they are finely ground.

2. Substitute Almond Flour or Almond Meal for the Hazelnut Flour.  Almond Meal is about one-third the price of Hazelnut flour.  My German friend Karin said she always makes her Kipferls with Almond Meal, but her German relatives grind their own nuts.

To continue with my saga…Upon returning home with my $16.95 package of Hazelnut Flour, I got out the recipe and got started.  No! Two vanilla beans?  TWO?  For 36 cookies?  It is now clear to me that I am making World’s Most Expensive Cookie and I am thinking these better be good.  (They were, thank goodness. So good I might have to make them again, and again, and again…)

This recipe is based upon Markus Zusak’s recipe for Kipferls as published in The Book Club Cookbook.  I made some changes to the method and to the ingredients.  Mr. Zusak’s mother mixed her dough by hand, I tried it for a bit, then resorted to my electric mixer.  I split the use of the vanilla beans, putting one in the cookie and one in the powdered sugar, Mr. Zusak put both in the powdered sugar. I had to quadruple the amount of powdered sugar to cover all the cookies, and I covered the cookies with the powdered sugar while the cookies were still warm* so get a crackly, almost melted sugar coating on the cookies. (*Let the cookies cool a little, to firm up a bit.  If you toss hot cookies in powdered sugar, the cookie will break.)

Kipferls

Crisp German Vanilla Hazelnut Butter Cookies

For the cookies

  • 1 ¾ cups all-purpose flour
  • 1 ¼ cups Hazelnut Flour or Hazelnut Meal or alternative (see above)
  • 2/3 cup granulated sugar
  • 14 tablespoons (1 ¾ sticks) butter, at room temperature
  • 1 whole vanilla bean, split in half, and insides scraped off with a knife.  Discard the outside of the vanilla bean

For the vanilla sugar

  • 1 1/3 cup powdered sugar
  • 1 whole vanilla bean, cut crosswise into 1-inch pieces (different preparation than above)
  1. Make the vanilla sugar first.  Place the powdered sugar with the chopped up vanilla bean in the bowl of a food processor fitted with a metal blade.  Process until the vanilla bean has been incorporated into the powdered sugar, several 10 second bursts.  Place a fine meshed sifter over a small bowl and sift the powdered sugar to remove the unblended pieces of vanilla bean.  Pour vanilla sugar into a large Ziploc bag. Set aside.
  2. Preheat oven to 350°F. Spray two baking sheets lightly with cooking spray or line with parchment paper.
  3. Combine all purpose flour, hazelnut flour/meal, and granulated sugar in a large bowl. Cut butter into 1/2-inch pieces and add to flour mixture. Scrape the inside out of the split vanilla bean and add to bowl.  With an electric mixer, mix dough for 3-4 minutes or until a soft dough is formed.
  4. Pinch off small pieces of dough (1 T; 1/2 oz; 15 grams) and mold gently between your palms to form 3-inch ropes, thicker in the middle and tapered at the ends.   This took a bit of doing to master.  I rolled the dough to the length of my three middle fingers.  I rolled the dough a bit more firmly with my ring and index finger so the ends of the dough would be thinner. Fashion each piece of rolled dough into a crescent shape and place onto the prepared trays, see picture above.
  5. Bake in preheated 350º oven for 15-20 minutes or just until the cookies are beginning to turn brown.  Mr. Kusak says that once the Kipferls are brown, they are over cooked.
  6. Remove cookies from oven.  Cool just slightly and then toss into the Ziploc bag with the vanilla sugar–tossing the cookies while they are still hot creates a slightly melted-on, and truly special coating.  Toss  cookies in vanilla sugar.
  7. Remove cookie to a cooling tray and repeat with remaining cookies and vanilla sugar.  If you have vanilla sugar left over, you can re-coat the cookies.
  8. Let cool completely before eating. The cookies will crisp up as they cool.

 Yield: About 3 ½ dozen cookies

Kipferls1

I hope you enjoy the World’s Most Expensive Cookie!  They ARE good and worth the cost and the effort. Thanks for stopping by my kitchen today!

PS…I am making another batch of these cookies to take to a Tahoe retreat this weekend.  One bag of that dangblasted expensive Hazelnut Flour does make three batches of these cookies…AND, Costco sells vanilla beans now.  Note my friend Sally’s point, put the vanilla beans in the powdered sugar as soon as you get them.  Once you are ready to make the cookies, remove the beans and use as outlined above.  The benefit is that some of the essence of the vanilla beans will have soaked into the sugar…yummmmm.

17 Aug 2011 Overnight Blueberry French Toast

My elder daughter, Hannah, found blueberries on sale at Safeway this week: four pounds for five dollars! After she posted the “find” on her facebook page I had to go out and get some… But WHAT am I going to do with four pounds of blueberries?!? Hannah made a Fresh Blueberry Pie  (one of our family’s favorites),  and I decided to try this recipe for Blueberry French Toast since it’s been in  my “To Try” file for ages.

I fell in love with overnight casseroles a few years ago.  I probably have overnight guests more than most, so I have quite an array of breakfast recipes, but I’ve gotten lazy.  Although I am usually up earlier than my guests, I’d just rather not rush to pull a breakfast together. I like to get up, make myself a latte, and enjoy some peace and quiet with the newspaper and the Internet –while in my jammies– before facing a busy day ahead.  Overnight casseroles are one of my secret weapons to maintaining my slow-and-easy morning routines, yet still provide a nice breakfast for my guests.

This breakfast casserole is really more of a cross between a bread pudding and french toast.  It’s not very sweet,  so you can douse it with powdered sugar or maple syrup. But with only two eggs, it’s not very egg-y or french toast-y.   And in spite of all that cream cheese, it’s not very cream cheese-y, either!  It is nice though; warm, full of juicy blueberries with just a hint of cream cheese and a hint of egg.  A side of bacon or sausage could be a nice salty, crispy counterpoint.  I think it’s best with enjoyed with some newly awakened house guests, a second latte, and a fun chat about the plans for the day.

Blueberry French Toast

  • 1 lb. cream cheese
  • 1/2 cup sugar
  • 2 teaspoons vanilla
  • 1/2 teaspoon cinnamon (original recipe called for 1 teaspoon, but that seemed a bit too much for me)
  • 2 eggs
  • 1 1/2 cups milk
  • 10 slices of good quality french bread, sliced about 3/4 inch thick, if possible
  • 2 cups fresh blueberries
  • Maple syrup or powdered sugar, to serve

Lightly grease a 9×13 inch baking dish and set aside.

With an electric mixer beat cream cheese sugar and vanilla together until smooth.  Add in the eggs, one at a time, beating well after each addition.  Slowly beat in the milk.

Cut the slices of french bread into cubes and spread evenly over the bottom of the prepared baking dish.

Sprinkle the blueberries on top of the cubed bread.

Pour the cheese-milk-egg mixture on top of the bread and the blueberries.

Cover and refrigerate overnight.

Remove casserole from refrigerator and preheat oven to 350 degrees.

Bake 40 minutes, or until golden brown (perhaps 5 minutes longer if casserole was still cold from the refrigerator when it went into the oven).

Serve with maple syrup and/or powdered sugar.

Thanks for stopping by my kitchen today!  If you still have blueberries leftover, be sure to make some Blueberry Oatmeal Muffins , which are one of  my top three favorite muffin recipes. Ohhh, and I’ll have to post the recipe for a Blueberry-Lemon Pavlova, too…!

14 Jun 2011 Chocolate-Peanut Butter Popcorn

My friends tell me I have more than my share of cooking gadgets.  I don’t disagree with them.  But I don’t have everything.  For example, I don’t have one of those quick freeze Popsicle makers, and until today I didn’t have a popcorn machine. The Popsicle maker is on my “Wish List”, but the popcorn machine has been on my kitchen counter churning out popcorn for the last few hours.

I needed a popcorn machine today.  My daughter Abby is manager of our neighborhood pool this Summer and tonight is the first Kid Movie Night.  The pool’s popcorn machine is broken, and she can’t have her first movie night without popcorn, now can she?  So we went out and got a popcorn machine.  It wasn’t expensive.  It was on super-duper clearance at Target.  I KNEW that lucky penny I found on the driveway this morning was going to mean something!

My daughter, being sensible and well organized (like her mother), thought she should practice with the popcorn machine before taking it down to the pool and expecting it to perform perfectly.  So she practiced, and managed to churn out a lot of popcorn.  The machine worked like a charm!  But there was about twenty-four cups of practice popcorn on our counter.  I ate a cup.  My grandson ate about four pieces, and then spilled a cup.  My son refused a cup. Only twenty-two cups to go!

I thought about making Caramel Corn with the popcorn.  I have a terrific Caramel Corn recipe posted, and while my Caramel Corn is one of my favorite foods on the planet, it is a bit of a bother to make.  Time was running out, so I turned to foodgawker, searched on Popcorn, and found this recipe for Chocolate Peanut Butter Popcorn.  On closer inspection I found the recipe had been posted by one of my favorite bloggers, Brown Eyed Baker.  The recipe had to be good!  I just knew it!  It was my lucky day.  That was one powerful penny.

This recipe is the same recipe as for Muddy Buddies, but using popcorn instead of Rice Chex.  It’s a cinch to pull together, and it’s good for you:  popcorn, whole grain; peanut butter, plant based protein; chocolate, dairy!  And it’s melt-in-your mouth delicious.  Seriously addictive. I am pretty sure you have all the ingredients in your cabinet, too.

And it’s Summer.  Don’t we all need a movie night?  How about movie night with one of the best popcorn snacks EVAH?!

Umm….there’s just one more thing.  This popcorn doesn’t keep well; it starts to get soft after a few hours.  So eat fast!

Chocolate Peanut Butter Popcorn

9 cups plain popped popcorn (top of stove, air popped, popcorn machine, microwaved…)
1 cup semisweet chocolate chips (or milk chocolate, or half bittersweet and half milk, or whatever chopped chocolate you have on hand)
½ cup creamy peanut butter
¼ cup butter
1 teaspoon vanilla
1½ cups powdered sugar

  1. Place the popped popcorn in a very large bowl.
  2. In a microwave  melt the chocolate chips, peanut butter and butter for about 1 minute.  Stir well. Chocolate and peanut butter should be melted and very smooth. Stir in the vanilla.
  3. Pour the chocolate mixture over the popcorn. Using a large spoon or spatula, stir until all of the popcorn is evenly coated with the chocolate/peanut butter mixture.
  4. Sprinkle the powdered sugar over the chocolate-covered popcorn and stir until evenly coated.
  5. Spread the mixture onto a baking sheet and place in the refrigerator for about 30 minutes or until the chocolate is set.
  6. Serve! Leftovers don’t keep well.  Eat everything as soon as it’s made!

Thank you for stopping by my kitchen today.  If you like what you see, please consider subscribing to my blog.  If you subscribe you will get a quick e-mail to alert you each time I post a new recipe (which I try to do a few times a week).  Great seeing you!

Polly

29 Jan 2011 Cream Cheese Frosting

I have been in a funk all week.  I made two more cakes from that book I was all aglow about last weekend.  I’m no longer glowing.

First off, I wanted to make the Red Velvet cake; the picture looked so great, and it was front and center on the cover, so I had high hopes.  The recipe was a bit odd though.  Red Velvet cake is supposed to have three things: 1) a very, very light chocolate taste 2) a very bright red color and 3) a pronounced tang from the addition of buttermilk and vinegar.  This cake was good on point one.  The recipe called for ¼ cup of cocoa powder, which is good.  I have seen some recipes for as little as 1 teaspoon of cocoa powder.  I wanted some chocolate taste in the cake!  The recipe also hit a high note on the red color.  The color in the picture looked good, and recipe only called for one tablespoon of red food coloring.  I have seen some recipes call for as much as three tablespoonsful!  My first hint of trouble was with point three, no buttermilk and no vinegar!  The recipe called for sour cream, but I was still going to go with it, thinking the sour cream would have enough tang.

Once I started making the cake, the trouble began.  First, the directions called for “a food processor”.  Um no.  The directions then said, ” Cream the butter in a mixer on medium speed”.  Not a food processor, a mixer.  Bad mistake. THEN, the directions called for two 8 or 9 inch cake pans, but the pictures of the cake-both on the cover, and next to the recipe-were of a three layer cake.  Uh-oh.  Having only two matching 8-inch cake pans, and two matching 9-inch cake pans, not three matching of either size, I decided to bake the cake in the  9-inch layer pans thinking the recipe probably meant to three 8-inch pans or two 9-inch pans.  I thought wrong.  I had too much batter for two 9-inch pans.  The pans were this close to overflowing.  The cakes baked up huge, and domed.  I am pretty sure the cake needed to be baked in three 9-inch pans.  Not sure how many 8-inch pans.  How could there be two such glaring mistakes on one recipe, especially in a book based on recipes that had been tested and that explicitly stated (and the specific reason I bought this book) that recipes with problems had been “rebaked” until they were right?

BUT, after baking, the cake looked good, but a bit crisp on the outside (probably due to over-baking because each pan held too much batter) and seriously domed.  Never mind, I thought.  I can fix it.  I trimmed off the over-browned sides of the cakes, and cut off the domed tops.  The cakes stacked nicely together.  Firm enough for a stable two layer cake, I thought.  I wasn’t overwhelmed when I tasted the discarded domed top, but I thought that was because the cake was still a bit warm from the oven, and didn’t have frosting on yet.

I mixed up the frosting for the cake.  It went on lovely and I spread it on thickly, but I definitely had enough left over for a third layer! Nevertheless, I though the cake was beautiful.  Look at the picture! I was all excited to kick off my Valentine’s Day marathon chocolate posts with this cake…, until I tasted it.  The frosting was to die for, but the cake was No Big Whoop, in fact, it was a Bad Whoop.   The light chocolate taste was good, and there was a bit of a tang, but it wasn’t a good tang.  The cake just wasn’t good. The color was red, but with a bad tasting cake, it made things worse.  I tested the cake on twelve of my favorite testers, my Dining For Women group. Most said the cake was OK, but nobody wanted me to make it again.  Everyone would prefer a chocolate cake, or a yellow cake, or a lemon cake or a carrot cake or a coconut cake.  No one wanted any more Red Velvet cake. The next morning I tasted the cake again, and I knew it was all over.  It just was not a good tasting cake.  Remember the red velvet armadillo groom’s cake in “Steel  Magnolias”?  Did you want a piece? This cake tasted as bad as that cake looked!  It was a tragedy.

I did get three requests for the Cream Cheese Frosting though. The frosting I will make again.  So the frosting recipe I will share.  I hope you have a good cake recipe to use it on!

Cream Cheese Frosting

From “All Cakes Considered” by Melissa Gray

  • ½ cup unsalted butter, at room temperature
  • 16 oz. cream cheese, at room temperature
  • 2 lbs. powdered sugar (about 7 ½ cups)
  • 1 teaspoon vanilla

Cream the butter and cream cheese together at medium speed.  Gradually add in the powdered sugar, beating until light and fluffy (3-5 minutes).  Add in the vanilla and beat until incorporated.  Makes enough frosting to decorate a three layer cake.

I served the Red Velvet cake, with another one made from the same book .  More problems with the recipe but well worth a rebake.  Version Two of the Drunken Monkey cake is sitting on my counter right now.  A definite improvement over Version One in looks. Taste testing tomorrow.  I sure hope it is good enough to post. Stay tuned!

Thanks for stopping by my kitchen today!