Tag-Archive for ◊ soup ◊

02 Oct 2019 Fresh Corn Soup
Fresh Corn Soup with Roasted Poblano Chilies, Queso Fresco, and fried corn tortilla strips.

This is such a plain and simple recipe, it’s hard to believe such a good tasting soup comes out of it!

The ingredient list for this soup is so ordinary that it’s hard to imagine how exceptional the soup tastes.  Been there, thought that. I was wrong. This soup is beyond the sum of its parts. Fresh Corn Soup is divine, and creamy and rich, but it’s not a hearty soup so it needs something else to go with it to make a full meal. Soup-and-sandwich anyone or, even better, a soup-and-enchilada combo?

I like to have this Fresh Corn Soup when the seasons are just beginning to change , just when cooler temperatures heighten the desire for soup and when the end-of-the-season corn-on-the-cob is still available. The original recipe said this soup can be made with frozen corn, so score one for simplicity! I always make things hard on myself though. I strip the corn kernels off six ears of fresh corn and then proceed with the recipe.

The toppings make this soup exceptional. Top each bowl of Fresh Corn Soup with a few corn tortillas cut into strips and fried in a little oil until crisp, a few crumbles of Queso Fresco, and a tablespoon or so of charred, peeled and diced poblano chilis.

This soup can be made vegetarian by substituting vegetable broth for the chicken broth, or by not using broth at all and using milk as the liquid ingredient.

Fresh Corn Soup

4 cups fresh corn kernels (from about 6 ears of corn) or 4 cups frozen corn kernels, defrosted.

1 cup water

4 tablespoons butter

2 cups chicken broth, vegetable broth, or milk

2 cups of milk

½ teaspoon table salt or 1 teaspoon Kosher salt

  1. Mix corn with water and place in blender, process until the water and corn combine into a smooth paste.
  2. Melt the butter in a large saucepan. Add corn puree and sauté for 5 minutes.
  3. Pour chicken broth (or veggie broth) plus milk into pan with corn mixture and bring to a boil.
  4. Reduce heat to medium and gently simmer soup for 15 minutes.
  5. Turn off heat and cool slightly.
  6. Don’t skip this step! I did once and it was not nice. Pour the soup into a fine mesh strainer. Retain the liquid and discard the solids.
  7. When ready to serve, gently reheat and serve with all three of the toppings below.

Makes about 6 cups of soup. Leftover soup freezes well.

Garnishes

2 Poblano Chilies

3 corn tortillas

Queso Fresco

  1. Char the poblano chilies over an open burner. When completely charred and black, place in a brown paper bag to cool. When cool enough to handle, rub the burned skin off with a paper towel, cut away the stem, seeds and membrane and then finely chop the remaining flesh.
  2. Cut the three corn tortillas into thin strips. Heat a thin layer of vegetable oil in a small fraying pan. When hot add some of the strips and fry until light brown. Repeat with remaining tortilla strip.
  3. Open the package of Queso Fresco and crumble the cheese.
  4. Add ½-1 tablespoon of diced chilies into bottom of the bowl along with approx. 1 tablespoon crumbled Queso Fresco.
  5. Ladle hot soup over the chilies and cheese.
  6. Top with crispy fried corn tortillas
Fresh Corn Soup made with white corn, topped with fancy corn tortilla shapes and Queso Fresco. Made and photographed by my daughter, Abby.

Thanks for stopping by my kitchen today.

19 Aug 2019 Grandma’s Buttermilk Cornbread
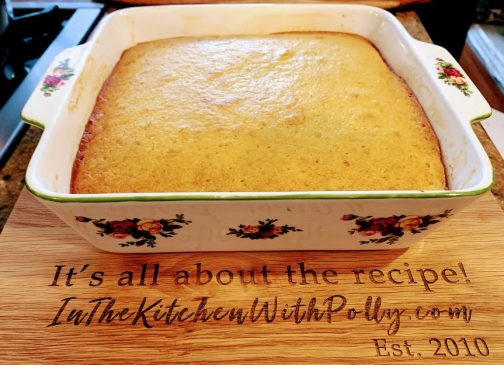
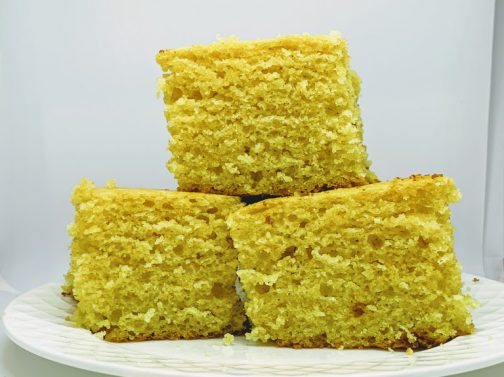
Grandma’s Buttermilk Cornbread
(on my brand new cutting board, a birthday gift from my daughter!)

As a young kid, Jiffy brand cornbread was my favorite and because it was cheap, I think it was fifteen cents a box, it fit into my family’s budget.  The mix only required one egg and a ¼ cup of milk or water to make six muffins.  As I got older, I tried many cornbread recipes and I tried to get fancy by adding in corn kernels or topping with cheese or stirring in sour cream.  I never settled on a recipe until I tried the Albers cornmeal no frills, back-of-the-box recipe baked in an 8″ x 8″ square pan. I was VERY happy with that recipe, until I found this recipe. The recipe is a bit odd, not so much in the ingredients, but in the mixing method. The resulting cornbread can’t be beat though, not by Jiffy, not by Albers, and not by adding in corn, cheese, and sour cream.

Cornbread is not just for chili or soup! In one of Ruth Reichl’s books, I learned how to elevate day old cornbread and now leftover cornbread is a favorite breakfast treat.  Cut the square slice of cornbread, or the muffin, in half lengthwise—across the middle so you have a top and a bottom not a left side and right side!  Butter the cut edges.  Lay the buttered side down in a hot frying pan.  Let the cornbread sizzle until the buttered sides are slightly browned and the cornbread is warmed through. Eat. Delicious!

This recipe was posted in All Recipes in 2006 by Bethany Weathersby. I’ve rewritten the steps to make the recipe easier to follow, but I have not changed any ingredients. Don’t use a mixer for this, cornbread needs to be combined by hand.

I am not going to get into the whole southern vs northern cornbread recipe debate. This is sweet cornbread, and I like it. I live in South San Jose in Northern California, and this recipe works for me and since I am posting it, I don’t see how anyone will not like it!

Can’t wait to try it with my Ham Bone Bean Soup or Gringo Grandma’s Chili
and then I’ll skillet toast another slice for breakfast 🙂

Grandma’s Buttermilk Cornbread

  • ½ cup butter
  • 2/3 cup of white sugar
  • 2 eggs, beaten
  • ½ teaspoon baking soda
  • 1 cup buttermilk
  • 1 cup cornmeal (yes, I use Albers)
  • 1 cup all-purpose flour (125 g)
  • ½ teaspoon salt (add ¼ teaspoon more if using unsalted butter)
  1. Preheat oven to 375 F.
  2. Butter an 8×8 inch square casserole dish
  3. Melt butter in a large skillet or medium saucepan
  4. Remove skillet from heat and stir in sugar
  5. Quickly add beaten eggs into butter-sugar mixture and beat until well blended
  6. Stir the baking soda into the buttermilk
  7. Add the buttermilk mixture to the butter-sugar-egg mixture in the pan
  8. Combine the flour, cornmeal and salt, whisk to evenly distribute
  9. Add the flour mixture into the pan with the butter-sugar-eggs-buttermilk mixture
  10. Stir until well blended, a few small lumps should remain
  11. Pour batter into the prepared 8×8 inch pan
  12. Bake in preheated 375 degree oven for 25-30 minutes or until a toothpick inserted into the center comes out clean
  13. Let cool a few minutes
  14. Serve and share

NOTES: According to the originator of this recipe, the baked cornbread freezes well. She also states that it’s OK to sub whole wheat flour for the all-purpose flour, but baking time will increase about 10 minutes. I haven’t tried this.

Thanks for stopping by my kitchen today, what shall we make tomorrow?

20 Apr 2012 Ham Bone Bean Soup

I love Honeybaked ham.  Love it, love it, love it; but have you heard the definition of eternity? Two people and a ham!  Thank goodness I have a panini press for grilled ham and Swiss sandwiches.  Thank goodness I know how to make and enjoy ham and pineapple pizza. Finally, the last of the ham appeared, the bone,  and now it’s time for Ham Bone Soup.

I could NOT find a recipe on the Internet that I liked.  I knowwww, shocking!  So I took a bit from this and a bit from that and came up with this recipe.  It tastes good,  looks good, and is fibrously good for you with lentils, split peas, yellow peas, 4 kinds of beans, tomatoes, onions, celery and carrots plus chicken broth and ham broth. The spices came from a soup on the Honeybaked Ham website, cinnamon, cumin and thyme. I knowwww, sounds odd, but it’s what gives this soup it’s depth.

Enjoy.  (BTW, The new definition of eternity?  One person and a vat of Ham Bone Soup!) This makes a LOT of soup, about 6 quarts. “Fortunately” a friend of mine broke her ankle, so I was able to take one-third of it over to her.  Now I  should check my Facebook to see if anyone has had a baby lately*

Ham Bone Bean Soup

  • 4 cups chopped ham from the ham bone
  • one ham bone plus assorted root veggies and peelings, covered with water
  • 1/4 cup lentils
  • 1/4 cup split peas
  • 1/4 cup yellow peas
  • 2-3 cups water
  • 1 large onion, diced ( approx. 2 cups)
  • 2 tablespoons olive oil (approx.)
  • 2 cups diced celery (include some leaves)
  • 1 leek sliced
  • 4-5 carrots, peeled and sliced (about 2 cups)
  • 28 oz. can crushed tomatoes
  • 3-4 quarts broth (mixture of ham bone broth and chicken broth)
  • 1 tsp. dried thyme
  • 1 teaspoon cumin
  • 1/2 teaspoon cinnamon
  • 2 bay leaves
  • 1/2  teaspoon black pepper
  • salt, to taste (depends on saltiness of chicken broth) maybe about 1 teaspoonful
  • 4 or 5 16 oz. cans beans (use your favorites, of course)  I used 2 cans white beans plus one can each black beans, pinto beans, and pinquito beans (all my favorites)
  1.  First off, cut the meat off the hambone, so that you have 4 cups diced ham, set aside.
  2. Now make some stock from the ham bone. Put the ham bone in a large pot, cover with water and add a whole quartered onion (peel and all), a handful of carrots (or the peelings), some coarsely chopped celery, and any other extra veggie you have on hand.  Bring the mixture to a boil and then simmer for 4 hours.  When cooked, strain the broth. Discard the bone and veggies.  Keep the broth. (The broth can be made one or two days in advance, just refrigerate cooled broth until ready to use)
  3. In another pan, boil the lentils, split peas, and yellow peas (or all lentils, or all split peas) in about 2 cups of water until very soft, about 45 minutes.  Add more water to pan if necessary.  Let cool, and then blend into a liquid.  This puree will thicken the soup (and hide the “icky dried stuff” from picky family members).
  4. Heat olive oil in a large skillet.  Add in chopped onion.  Gently sautee until onion is cooked through and slightly caramelized.  Stir in chopped celery and sliced leek, saute for an additional 3 minutes or so.
  5. In a large soup pot, pour in the ham bone broth and enough chicken broth to equal about 3 quarts.  Stir in crushed tomatoes and lentil/split pea puree and spices (cinnamon, cumin, thyme, bay leaves, salt and pepper). Bring to a boil. Stir in carrots. Simmer until carrots are almost tender, about 20-30 minutes.
  6. Drain and rise the canned beans.  Add to simmering broth.  If soup seems too thick, stir in up to one additional quart of chicken broth.  Simmer for an additional 30 minutes.  Remove bay leaves.  Let soup cool, then refrigerate overnight (if possible, soup always tastes better if refrigerated overnight).
  7. When ready to serve, reheat soup, add diced ham, and simmer for an additional 15 minutes.  Taste broth.  If necessary add more salt, pepper, and cinnamon.  Serve hot with some nice bread, foccacia, or cornbread.

Hope you like this. Hope it was just the soup you were looking for but couldn’t find anywhere else on the Internet.

*Update:  Woke this morning to find the empty soup pot on the kitchen counter and three dirty soup bowls stacked in the sink along and dredges of sourdough toast everywhere.   Looks like my son and two friends had a late night snack after I went to bed.  They emptied the pan; there’s no more Ham Bone Soup left.  Should I put a happy face icon after this update, or a sad face icon?!

Thanks for stopping by my kitchen today!


19 Jan 2011 Pho (Vietnamese Beef Noodle Soup)

Depending on where you live, you may or may not have a proliferation of “Pho” restaurants in your community.  If you do have a Pho restaurant nearby, I encourage you to try it out.  You’ll be rewarded with a huge bowl of broth and noodles, to which you add fresh basil, cilantro, mint, bean sprouts, peppers, chili sauce, and freshly squeezed lime.  The broth is quite tasty, and with the addition of all the toppings, the Pho has a very fresh taste.   On your first visit to a Pho restaurant, stick to Beef Pho or Chicken Pho, with the parts of beef and chicken that you are familiar with.  There are some other types of Pho which might be a bit challenging to an uninitiated American palate.

Having fond memories of Pho, I wanted to make it for myself.  I wanted to have a clear, rich, fat-free broth. I thought it would be great to have some of the broth on hand, and be able to boil it up and stir in some fresh ingredients whenever I wanted to.  I also think Pho would be a great dish to make ahead and then take to share with friends and family at a snow condo or beach house.   I found this recipe adapted from the cookbook Into the Vietnamese Kitchen at Steamy Kitchen.  It’s great!  I served it to seven friends, and three family members, and they all though it was great, too.  SCORE!

Before you make this dish, you should know how to pronounce it, “pho”  is pronounced “fuh” and not “foo” or “foe” or “poe” or  “puh” — that’s fuh-sho’!

If you have made your own chicken soup before, Pho is no more bother.  Follow the recipe below and make sure you buy good bones, start the day before, rinse and blanch the bones, have three hours to let the bones simmer. Then you can let the broth sit in the refrigerator overnight so that the hardened fat can be removed before finishing the pho.

Pho (Vietnamese Beef Noodle Soup)

The broth

  • 2 onions, peeled, sliced across into 4 slices
  • 4″  of fresh ginger, peeled, halved lengthwise
  • 5-6 lbs of good beef  knuckle bones (beef shanks/knuckles $1.99/lb)
  • 6 quarts of water
  • 1 cinnamon stick
  • 1 tablespoon coriander seeds
  • 1 tablespoon fennel seeds
  • 5 whole star anise
  • 1 cardamom pod
  • 6 whole cloves
  • 1 ½ tablespoons kosher salt
  • ¼ cup fish sauce
  • 1 teaspoon sugar

In the soup bowls

  • 1 rice noodles (dried or fresh)
  • cooked beef from the broth
  • ½ lb flank, london broil, sirloin or eye of round, sliced as thinly as possible.

On the side

  • fresh mint leaves
  • fresh cilantro
  • sliced fresh basil
  • limes wedges (2)
  • 2-3 chili peppers, sliced
  • bean sprouts (about 1 lb)
  • Hoisin sauce
  • Sriracha hot sauce

Char:

Turn broiler on high and move rack to the highest spot. Place ginger and onions on baking sheet. Brush just a bit of cooking oil on the cut side of each. Broil on high until ginger and onions begin to char. Turn over and continue to char. This should take a total of 10-15 minutes.

Parboil the bones:

Don’t skip this part! Fill your biggest pot (12-qt capacity would be ideal) with cool water. Boil water first, and then add the bones, keeping the heat on high. Boil vigorously for 10 minutes. Drain, rinse the bones and rinse out the pot. Refill pot with bones and 6 qts of cool water. Bring to boil over high heat and lower to simmer. Using a ladle or a fine mesh strainer, remove any scum that rises to the top.

Boil broth:

Add ginger, onion, spices, sugar, fish sauce, salt and simmer uncovered for 1 1/2 hours. Remove the beef meat and set aside. Continue simmering broth for another 1 1/2 hours. Strain broth and return the to the pot. Taste broth and adjust seasoning – this is a crucial step. If the broth’s flavor doesn’t quite shine yet, add 2 teaspoons more of fish sauce and 1 teaspoon of regular sugar–and another pinch of salt, if needed (I over-salted my broth, so be careful). Keep doing this until the broth tastes perfect refrigerate broth overnight and remove hardened fat the next morning.

Prepare noodles & meat:

Slice your flank/london broil/sirloin as thin as possible – try freezing for 15-30 minutes prior to slicing to make it easier. Cut or shred the cooked meat from broth and set aside. Arrange all other ingredients on a platter for the table. Guests will garnish their own bowls. Follow the directions on your package of noodles – for some fresh rice noodles, just a quick 5 – 45 second blanch in hot water is all that’s needed.

Serving:

Bring your broth back to a boil. Line up your soup bowls next to the stove. Fill each bowl with rice noodles, bean sprouts, shredded cooked beef and raw meat slices. As soon as the broth comes back to a boil, ladle into each bowl. The hot broth will cook your raw beef slices. Serve immediately. Guests garnish their own bowls with the mint, basil, cilantro, peppers, lime, and sauces.

I hope you enjoy this soup as much as I do. It’s a chin dribbling, big bowl of healthy, comfort food with a fresh & crunchy twist.  One of my favorite foods I believe. I have my fingers crossed that I will taste the real thing in Vietnam next year.  I hope this measures up. Thanks for stopping by my kitchen today!