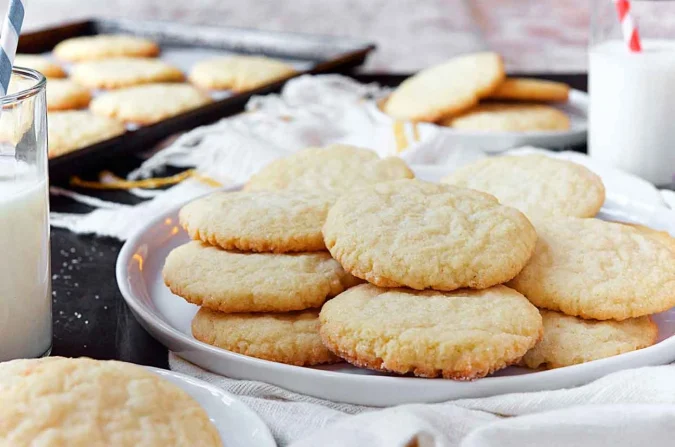
Tag-Archive for ◊ cookie ◊

31 May 2019 Madelienes

Madeleines. What are they anyway?  Almost a cookie but really a slightly dry cake?  Yes, that’s right! No frosting? Nope, but they are often dusted with powdered sugar… No caramel swirl? Never! No bits of chocolate? Not usually… And what’s with that lump on the back? Gotta have a lump in the back! Sooo…, what’s the big deal? Madeleines are super plain, super dry, and super yummy, I love them! Madeleines are popular tea cakes in cafes around the world. The world loves them!

Madeleines are French tea cakes, but thought of as a cookie, and are instantly recognizable with their scalloped shell shape that is ribbed on one side and smooth, but with a hump, on the other. Direct from the oven these buttery cakes have wonderfully crisp edges, tender crumb and are best eaten right away, although they will keep in a tin on the counter for 3-4 days. A dusting of powdered sugar is all that they really need, although some brush still warm Madeleines with a tangy lemon glaze.  Starbucks dips tips of their Madeleines into chocolate.

Madeleines are quite easy to make, but you’ll need to purchase scalloped Madeleine molds to get started. The molds are available in different sizes and materials, but you’ll probably find non-stick pans to be the easiest to use.

I have tested out many recipes over the years.  This one is from Epicurious, but with changes to cooking times, method, and ingredients (I doubled the lemon zest, upped the vanilla, added in some baking powder, reduced the oven temperature and reduced the baking time).

The recipe below makes 24 Madeleines.

Madeleines

  • 2 large eggs
  • 2/3 cup sugar
  • 1 1/2 teaspoons vanilla
  • 1 teaspoon grated lemon zest (usually from one medium lemon)
  • 1/8 teaspoon salt
  • 1 cup (125 grams) all purpose flour
  • 5 oz (10 tablespoons, 1 1/4 sticks) unsalted butter, melted and cooled slightly (plus extra to brush in molds)
  • Powdered sugar
  • Extra melted butter to brush on pans
  1. Preheat oven to 350 degrees.
  2. Brush each madeleine mold with melted butter (use the additional butter, not the 5 oz needed for the batter!)
  3. Beat eggs and sugar with electric mixer just to blend
  4. Beat in vanilla, lemon zest, and salt
  5. In another bowl, whisk flour with baking powder and salt and then add gradually to butter-sugar-egg mixture.
  6. Gradually add melted and cooled butter to mixture, beating with electric mixer just to blend
  7. Spoon 1 tablespoon batter into each buttered madeleine mold
  8. Place in preheated oven and bake for 9-10 minutes or until edges are slightly browned and there is a visible hump in the middle of each madeleine.
  9. Remove from oven and let cool in pan for about 5 minutes before removing to a cooling rack to cool completely.
  10. Repeat with remaining batter. Recipe makes 24 standard sized madeleines
  11. When cool, dust with powdered sugar. If necessary dust with powdered sugar again just before serving.

Note: Batter can be made one day ahead. Refrigerate batter and baked on day two.

Variation: replace lemon zest with orange zest and add 1/8 – 1/4 teaspoon ground cardamom to the flour mixture.

Thanks for stopping by my kitchen today! I hope you find someone wonderful to share these special treats with 🙂

04 May 2019 Apricot-Coconut Bars

Feel like baking this weekend? Try these! They are delicious, one of my favorite bar/tray bake recipes. The bars are buttery, crisp, jammy, and coconut-y all at the same time. The dozen or so diced dried apricots sprinkled on top of the apricot jam boost the apricot flavor appreciably.

I’ve been making these bars for at least a decade. The original recipe was made with raspberry jam (and no diced apricots, obviously), but I think my apricot jam version with the addition of diced dried apricots takes the cake…, the bar…, the tray bake!

Apricot-Coconut Bars

1 ½ cups sweetened flaked coconut, divided use

1 ¼ cups all-purpose flour

¾ cup packed light brown sugar

½ teaspoon salt

¾ cup cold, unsalted butter, cut into small pieces

1 ½ cups old-fashioned oats

¾ cup apricot jam

10-12 dried apricots finely diced

  1. Prepare a 9×13 pan by lightly greasing bottom and sides or lining with parchment paper.
  2. Preheat oven to 375 degrees F.
  3. Toast the coconut in a dry frying pan until golden. Stir constantly and watch carefully OR spread onto a baking sheet and bake in a 375 degree oven for about 8 minutes. Set aside to cool.
  4. In the bowl of a food processor blend flour, brown sugar and salt. With motor running add butter pieces gradually then blend until a dough begins to form.
  5. Add 1 cup of toasted coconut and all of the oatmeal to dough in bowl, mix lightly but thoroughly, approx. 2-4 short bursts.
  6. Reserve ¾ cup of the dough and set aside.
  7. Press remaining dough into bottom of a prepared 9×13 inch baking pan.
  8. Sprinkle chopped dried apricots over dough.
  9. Spread jam evenly over dried apricots and the dough layer (It might help to heat jam briefly in the microwave to make it easier to spread).
  10. Crumble reserved ¾ cup of dough over jam.
  11. Sprinkle reserved ½ cup coconut over top of bars.
  12. Bake in middle of preheated 375 degree oven for 20-25 minutes.
  13. Cool in pan.
  14. Lift entire slab out of pan, transfer to cutting board and cut into bars of desired size and shape.
  15. Bars can be made 3 days in advance and stored in an airtight container at room temperature.

Thanks for stopping by my kitchen today!

24 Mar 2017 Chocolate Peanut Butter Chip Cookies


chocolate-peanut-butter-chip-cookies

This recipe is from the back of the bag of Reese’s Peanut Butter Chips (see picture below).  The cookie is fabulous.  It’s like a peanut butter cup in cookie form.

My daughter made these cookies for a “Back of the Box” themed Cookbook Club meeting.  She loves peanut butter.  She saw the chips.  She read the recipe on the back of the bag.  She made the cookies. Everyone swooned. End of story.

Well, not quite the end of the story because now I’m posting the recipe, as is, lifted right off the back of the Reese’s Peanut Butter Chip bag. You’ve just read the recipe and my swooning review. You are going to go out to get a bag of Reese’s Peanut Butter Chips. You are going to make the cookie. You and yours will swoon. You’ll go down as one of the best cookie bakers EVER!

End of story.

Chocolate Peanut Butter Chip Cookies

  • 3/4 cup cocoa powder (natural baking powder-like Hershey’s, NOT Dutch processed cocoa powder)
  • 1 teaspoon baking soda
  • 1 10 oz. pkg REESE’S Peanut Butter Chips – divided use
  • 1 1/4 cups butter (2-1/2 sticks), at room temperature
  • 2 eggs
  • 2 cups sugar
  • 2 teaspoons vanilla extract
  • 2 cups all-purpose flour
  • 1/2 teaspoon salt


  1.  Preheat oven to 350°F.
  2. Stir together flour, cocoa, baking soda and salt; set aside.
  3. Beat butter and sugar in large bowl with mixer until fluffy, 3-5 minutes.
  4. Add eggs and vanilla; beat well.
  5. Gradually add flour mixture, beating well.
  6.  Stir in most of the  peanut butter chips. Hold out some peanut butter chips to decorate the tops of the cookies before baking.
  7. Drop by rounded teaspoons onto ungreased, preferably parchment lined, unrimmed cookie sheet. If desired, press 2, 3, or 4 peanut butter chips onto the top of each cookie.
  8. Bake 8 to 9 minutes. (Do not over bake; cookies will be soft. They will puff while baking and flatten while cooling.)
  9. Cool slightly; remove from cookie sheet to wire rack. Cool completely.
  10. Makes about 4 dozen cookies, but depends on the size of your cookie.

Thanks for stopping by my kitchen today!

reese-s-peanut-butter-chips

29 Mar 2014 Caramel and Chocolate Covered Graham Crackers

Graham-crackers-2

It’s been a terrible, horrible, no good, very bad few days around here. We are all fine, but there was a family brouhaha that just didn’t sit right. We were all out of sorts, and, truth be told,  a bit afraid of what the future will bring, too.  So what to do? Make the all time favorite family comfort food, of course!

This recipe is rustic and quik, and it’s done in 20 minutes.  So it’s great just to start on this and put some of that pent up adrenaline to good use. But then there’s the cooling off period. Once made, these bars have to  sit in the refrigerator to harden up a bit. Again, another good thing.  A cooling off period is needed after a big family brouhaha.  Then comes the peace and contentment, sitting down with a good cup of coffee, some rustic chocolate covered graham crackers and reflecting on what went right and what went wrong, and figuring out how to right the wrongs and ultimately, bringing peace back to the family.

In August of 2005 my friends Sharon and Margie, from Lake Arrowhead Retreats, gave me a recipe for Saltine Toffee Cookies which they had found on AllRecipes.com.  Truth be told, the recipe didn’t sound very good.  Saltine crackers, brown sugar, butter, and melted chocolate?  Just say no.  But they insisted I try it.  They insisted the recipe was good.  I trusted them, they make some great food, so I tried it. It WAS good. VERY good.  Then I came to find out this recipe is sort of an Internet sensation and I might have been the last person on the planet to know about it!

Years pass, and one fine weekend, I took a chocolate making class.  The instructor of the class talked about how her mother used to make a ganache and pour it over crumbled up graham crackers as a bedtime snack for her and her siblings (I know, I know, what a Mom! I never did that for MY kids…).  Then the gears started churning.  Chocolate covered graham crackers are one of my favorite things in the whole wide world, but I had never made them.  The chocolate covered graham crackers from Starbucks are the best, but they are a bit too rich with a bit too much chocolate. OH!  The light bulb popped!  Could I make chocolate covered graham crackers for my kids, too?  I could one-up that other Mom, as well!  I could make chocolate covered graham crackers and with caramel!  Never mind that she was using a fancy ganache and I was just melting giant chocolate bars, LOL! What if I use the Saltine Toffee Cookie recipe but substitute graham crackers for the saltine crackers.  What if???

So I did it.  Many times.  My son says these are the best things I make. The last tin I made, hidden in the refrigerator behind the lettuce, lasted only three days.

Turns out, I am not the first person to think of this!  Lots of people on the Internet have used graham crackers instead of saltines with this recipe. Again, why am I one of the last people on the planet to know about this?! 🙂 Anyway, here’s my recipe.  You can find lots of versions all over, but this is the one that works for me.  Keep these Caramel Chocolate Covered Graham Crackers refrigerated, when they are not being eaten…  If these cookies sit out too long at room temperature the graham cracker starts to soften and loose it’s crunch 🙁 My 2005 copy of this recipe (with saltines rather than graham crackers) specifies that the recipe makes 35 servings. ROFLMAO!!! That’s so funny 🙂

Caramel and Chocolate Covered Graham Crackers

  • approx. 2/3 a box of graham crackers (two wax covered packages out of a box of 3 packages)
  • 1 cup butter
  • 1 cup dark brown sugar
  • 1 large sized (4 or 5 oz) chocolate bar, chopped (I like a Symphony Bar or a Cadbury Bar, if you like dark chocolate, the Hershey’s Special Dark Bar is good)
  • ¾ cup chopped nuts (if you like nuts.  I have never added nuts) OR, if it’s December, crushed candy canes! (I loooove this option!)
  1. Preheat oven to 400 degrees.
  2. Line a rimmed cookie sheet with graham crackers.  Place the graham crackers as close together as possible. You will need most of 2 waxed covered packages. Set tray aside.
  3. In a medium saucepan, combine butter and sugar and stir constantly, over medium heat, until sugar is melted.
  4. Raise heat slightly, to bring mixture to a boil.  Boil vigorously for 3 minutes, without stirring–shaking the pan occasionally is OK (the original directions said to “stir constantly” but I have found this to make a grainy caramel layer).
  5. Immediately pour caramel over graham crackers.  Use an offset spatula to quickly spread the caramel evenly over the crackers.
  6. Place tray in hot oven and bake for 5 minutes.
  7. Remove tray from oven and sprinkled chopped chocolate evenly over top.  Let chocolate just sit on top of caramel for 5 minutes.
  8. Spread the now melted chocolate evenly over the caramel.  Sprinkle with nuts (if using).
  9. Let tray sit until chocolate has hardened.  This make take a few hours.  To speed things up, put the tray in the refrigerator for about 15-20 minutes.
  10. When chocolate is set, break bars into uneven pieces. Sneak a piece or two.  Serve or cover and hide in refrigerator until needed.

Thanks for stopping by my kitchen today!  If there is a brouhaha in your family, I hope it’s over quickly and sweetly!