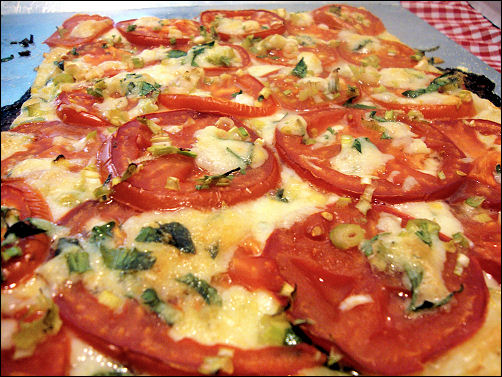
Tag-Archive for ◊ pizza ◊

22 Oct 2010 Breakfast Biscuits

These homemade breakfast biscuits are bigger, better, prettier and tastier than anything you’ll find at a fast food place or diner, and probably have a lot less fat. How can you resist these?  Don’t be scared.  They go together pretty quickly, and the payoff is enormous. Make customized versions, and you’ll fast become a legend in your own kitchen!

Start with this  recipe as a guide, then customize, customize, customize. Use whatever meat you have on hand, with bacon, sausage and ham being perennial breakfast favorites (and seem to make most people swoon).  The Breakfast Biscuit pictured above has no meat, only onions, peppers, and tomatoes. I’ve made the Breakfast Biscuits exactly like the ones below,as well as sausage and olive breakfast biscuits,  Honey Baked Ham breakfast biscuits, and the veggie biscuits above.  I want to incorporate asparagus and mushrooms in the next ones. Note, most veggies will need to be precooked (leftover from dinner?), but the tomatoes can be fresh picked.  Now, I am not endorsing this, but one of my friends told me she made these with refrigerated biscuit dough and they worked out very well…

This recipe makes 6 breakfast biscuits, and they are big. If you have a chance to get medium eggs, do so, I found the large eggs were just a tad too large, some of the whites spilled out of the biscuits, but no biggie.

Breakfast Biscuits

For the topping:

3 bell peppers, cut into thin strips (or substitute any cooked veggie, or none at all)
1 onion, thinly sliced
1 – 2 tablespoons butter
1 cup finely diced cooked ham (or sausage, or bacon…salmon?)

For the biscuit dough:

2 cups flour
2 teaspoons baking powder
1 teaspoon salt
1 stick cold butter, cut into bits (I grate frozen, or very cold, butter into the flour)
1/2 cup plus 2 tablespoons milk
2 cups grated Münster, Monterey Jack, or Cheddar/Jack mix or Mozzarella mix (or whatever you have on hand, use it all up!)
6 eggs (medium or small work best)

In a large skillet cook the bell peppers (or other veggie) and the onion in the butter over medium heat, stirring, until the vegetables are softened, stir in the ham, and remove the skillet from the heat. (This can be made 1 day in ahead, if needed.)

Preheat oven to 425 degrees.

Make the biscuit dough:

In a bowl whisk together the flour, the baking powder, and the salt, add the butter, and blend the mixture until it resembles coarse meal. Add the milk and stir the mixture until it just forms a dough. Gather the dough into a ball, on a lightly floured surface knead it gently 6 times, and cut it into 6 equal pieces. Roll each piece of dough into an approx. 7-inch round, form a 1/2-inch-high rim on each round by turning in the edge of the dough and pinching it until the shell measures approx. 5 inches. This does not have to be perfect, but a high outer crust will help contain the egg. The rustic look is great! Transfer the rimmed rounds to 2 buttered large baking sheets.

Divide the cheese among the shells. Top with veggie/ham mixture. Now, make a well in the center by pushing the filling to the rim (this step is important!).

Original directions: Crack and drop an egg carefully into the well of each shell. Bake the bicuits in the middle of a preheated 425°F. oven for 12 to 15 minutes, or until the egg yolks are just set.

My directions: Following the original directions produced  hard-boiled eggs, which made the biscuits easy to eat (and pleasing to the kids because they were, most definitely, finger food–they turn out like small pizzas!) BUT, I like soft eggs, so I cook the biscuits without the eggs for ten minutes.  Then I carefully crack an egg into the center of the biscuit and continue cooking until the egg yolk is set, but still soft (usually 3-4 minutes more), and the white is completely cooked.

Thanks for stopping by my kitchen this morning. I’d love to hear what you have to say!

10 Sep 2010 Crockpot Pizza Sauce (and yummy extras)

I’ve finally found something that the crockpot (slow cooker for those of you offended by the term “crockpot”) excels in.  Excels in!  This is not just a recipe that can be cooked in the crockpot. It’s a recipe that should be cooked in a crockpot.  Yes, a recipe that tastes best cooked in the crockpot!  I found this recipe in “Not Your Mother’s Slow Cooker Cookbook” by Beth Hensperger and Julie Kaufmann (San Joseans!), on page 250.

I have made my fair share of pizza sauces and this is, by far, my favorite.  The flavor is so rich and consistent.  I’m in love!  What’s more, one batch of this recipe makes about 6 cups of pizza sauce.  Use one portion, freeze four! That’s my type of batch cooking.

Crockpot Pizza Sauce

2 12 oz. cans tomato paste
1 16 oz can tomato sauce
3 tablespoons olive oil
2-4 cloves garlic, crushed (to taste)
2 tablespoons dried oregano
1 tablespoon dried basil
1/4 cup minced fresh flat leafed parsley
1 tablespoon sugar
1/4 cup water
3 tablespoons grated Parmesan (or similar) cheese
salt and pepper, to taste

Place everything but the cheese, salt and pepper in the crock pot.  Cover and cook on low for at least 10 hours and no longer than 14 hours.  If at all possible, stir the sauce every few hours.  If you are sleeping, don’t worry about it.

Unplug crockpot.  Taste.  Add salt and pepper to taste.  Stir in cheese.  Let cool to room temperature.

I use just over 1 cup of sauce in my pizza.  Depending on the size of your pizza pan and your personal preference regarding the quantity of  sauce you might more or less than I do.

Sauce will keep, refrigerated, for at least four days.  Freeze for longer storage.

My Favorite Cheese Blend for Pizza

Like I said, I have made my share of pizza over the years.  I am finally getting good at it!  Last night’s pizza was fresh veggie…, sliced tomatoes, zucchini and basil, from my garden, and sliced fresh mushrooms and green onions.

Two of my three kids would holler, “Where’s the meat?”, but they are not home so I get to choose everything!

Whatever pizza I make, I always use this cheese blend.  I no longer have the cookbook I got it from, nor do I remember the name of the book, which is unfortunate now that I am going public with this blend.

2 parts shredded mozzarrella
1 part shredded smoked gouda
1 part shredded Italian Fontina
1 part freshly grated Parmigiana-Reggiano

Enjoy your creations! OH, you need a recipe for pizza dough, too?  Here you go… I hope you have a bread machine 🙂

Pizza Dough (for the bread machine)

1 1/3 cups water
1/4 cup olive oil
3 1/2 cups flour
1 tablespoon sugar
1 1/2 teaspoons salt
2 teaspoons yeast

Place all ingredients in bread machine.  Press “Quick Dough” or “Pizza Dough” cycle. Use immediately (as directed below), refrigerate overnight or freeze for up to three months.  Let frozen dough defrost overnight in refrigerator.  Let refrigerated dough rest for 20 minutes at room temperature before using.

Remove dough to a work surface sprinkled with flour or cornmeal. Divide into 2 parts (for large pizzas).  Roll or press dough into a circle about the size of your pizza pan.

Use dough immediately to make a pizza, or let rise 30 minutes or so for a thicker crust pizza.

When you have it all assembled, bake in preheated HOT oven (500 degrees) for 12-15 minutes.

Have fun assembling the perfect pizza!  Thanks for stopping by my pizzeria today. See you tomorrow!  Remember how much I like feedback.  I’d love to read your comments about this, or your experience making pizza at home.

02 Sep 2010 Fresh Tomato Tart

Fresh Tomato Tart

It’s been a long, cool summer here in California.  I’ve enjoyed it, loved it actually, but I did begin to wonder if we’d EVER “suffer” from our usual abundance of garden grown tomatoes.  Finally, the end of August, beginning of September 2010, we have an abundance of tomatoes.  My neighbors and Facebook friends have been asking for recipes to use up their tomatoes.  I have two good ones.  The Fresh Tomato Lasagna that I posted earlier this week, and this Fresh Tomato Tart which was a staple at our house last summer.  This year I’ve made it once, this afternoon, to welcome my daughter home for a quick 18-hour visit. I used 6 of my dry-farmed garden tomatoes.  I had better make another one, like I said, we finally have an abundance of organic, garden grown, dry-farmed tomatoes.  (I dry-farm my tomatoes every year.  The tomatoes are smaller, but oh so sweet and flavorful.  To dry-farm your own tomatoes, as soon as the fruit begins to set, stop watering.  YEP. No water. At all. Ever.) BTW…, I made this once without the feta cheese (not something I always have on hand) and it wasn’t nearly as good. My older daughter has substituted goat cheese for the feta, and she likes that.  But I hate (no, I loathe) goat cheese, so that doesn’t work for me. The inspiration for this recipe was from a 2009 Cooking Light magazine.  I used the cheese mixture from one of their recipes (can’t, for the life of me, remember which recipe), but then I changed everything else to get this…

Fresh Tomato Tart

1 sheet puff pastry, thawed 2 cups thinly sliced tomatoes (five or six medium tomatoes, discard the top and bottom slices) 1/3 cup thinly sliced green onions 1/2 cup thinly sliced basil leaves 1 Tablespoon thinly sliced fresh oregano (or pinch of dried) salt, pepper 1/2 cup shredded mozzarella 1/2 cup crumbled feta 1/4 cup grated Parmesan AND 1/4 cup grated Parmegiano-Reggiano (OR, 1/2 cup of just one cheese) Preheat oven to 375 degrees. Lightly coat an unrimmed cookie sheet with cornmeal, oil or spray (I prefer to use the cornmeal). Unroll puff pastry, thin out a bit by rolling, then prick all over with a fork. Place in hot oven for 10 minutes. Meanwhile, slice tomatoes and place on 2 layers of paper towel. Roll towels with tomatoes, and set aside for tomatoes to drain while you mix the cheeses, basil and oregano together in a bowl. Remove puffed pastry from oven. Sprinkle 2/3 of cheese/herb mixture over hot pastry. Place drained tomato slices on top of cheese. Sprinkle with salt, pepper, sliced green onion, and remaining cheese/herb mixture. Return to oven and cook for an additional 15-20 minutes, or until golden. Thanks for stopping by both my kitchen, and my garden, today.  It’s been a fun summer, but I am ready for fall.  If you make this, let me know how you like it!