Tag-Archive for ◊ Supper ◊

11 Sep 2013 Caprese Garlic Bread (with Tomatoes, Mozzarella and Basil)

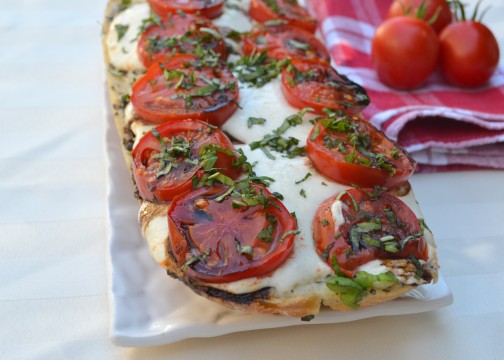
caprese bread

It’s just garlic bread, folks, but it’s garlic bread with an upgrade! After running across this recipe at Two Peas and their Pod,  I decided I needed to make it! I quickly sent texts to a few friends and invited them to come over for a light supper and four replied “YES”!  I served this bread, a platter of cold shrimp, some sliced melon, iced tea and lemon meringue pie. It’s  great having friends who are good with spur-of-the-moment things 🙂

The bread was very good!  The Balsamic Reduction highlighted the simple tomato, cheese, and basil topping.  I made a few changes to the original recipe:  I used my own garlic bread base, I adjusted the cooking time for the balsamic reduction and I baked the tomatoes on the bread instead of laying them on after cooking.  BTW, do not skip the balsamic reduction, it’s fabulous!

I hope you have some backyard (or farmer’s market)  tomatoes on hand, because store bought tomatoes just aren’t invited to this party! And the photo above shows a bit too much cheese.  I bought fresh mozzarella from Costco and it came pre-sliced, so I just went with it.  Turns out I used double the cheese!  Oooops!  No one complained though 🙂  The recipe below has the correct amount of cheese listed but if you want to up it a bit, that’s up to you. One other piece of advice, the tomatoes shrink when baked, so pile them on the bread.  I think I could have added another slice of tomato to each row!

Caprese Garlic Bread

AKA: Garlic Bread with Tomatoes, Mozzarella and Basil

  • 1 loaf sourdough bread, horizontally cut in half (french bread would work, too.  The original recipe called for ciabatta, but I am in the SF Bay Area and sourdough rules around here!)
  • 4 tablespoons salted butter, softened
  • 3 cloves garlic, minced
  • 1/4 cup grated Parmesan cheese (plus and extra tablespoon or so for garnish)
  • 3 Tablespoons dried onion, if you have it
  • 2 teaspoons dried basil (or 2 Tablespoons fresh)
  • 2 teaspoons dried parsley (or 2 Tablespoons fresh)
  • 12 oz. fresh mozzarella cheese, sliced
  • 1/2 cup balsamic vinegar
  • 2-3 medium tomatoes, sliced
  • Salt and freshly ground black pepper, to taste
  • 1/3 cup chopped fresh basil
  1. While you are getting all the ingredients together and doing the prep work, make the balsamic reduction. Place 1/2 cup balsamic vinegar in a small saucepan. Bring the vinegar to a boil, decrease the heat to low, and simmer, stirring occasionally, until the mixture is reduced by about half. How do you know when the vinegar has been reduced by half? Keep the measuring jug near the pan.  Every once in awhile pour the hot vinegar into the measuring cup.  If it’s not at 1/4 cup yet, pour it back in the pan and continue boiling. Keep doing this until the vinegar has been reduced to 1/4 cup. This will take about 10-15  minutes. Set the reduction aside to cool.  You won’t  need to use it until just before serving.
  2. Preheat oven to 400 degrees F.
  3. In a small bowl combine butter, garlic, dried onion, basil, parsley, and parmesan cheese.  
  4. Cut the loaf of bread in half horizontally. Place both sides of the loaf on a large baking sheet with the cut side up. Spread the garlic butter mixture over both sides of the cut bread.  Spread to all the corners and completely to the outer edge of the bread.
  5. Place the mozzarella cheese slices on top of the bread, making sure the cheese covers the bread completely.
  6. Top the cheese with the sliced tomatoes.  Sprinkle tomatoes with salt and pepper, to taste. If desired, sprinkle a bit of parmesan cheese over the tomaotes.
  7. Bake the bread at 400 degrees for 12-15 minutes or until the cheese is melted.
  8. Remove the bread from oven.  Sprinkle fresh basil over the top of the bread and drizzle with balsamic reduction.
  9. Cut into slices and serve.

That’s all there is too it!  Enjoy the last of your summer tomatoes!  They are special, aren’t they? And thanks for dropping by today!

02 Aug 2013 Beans!

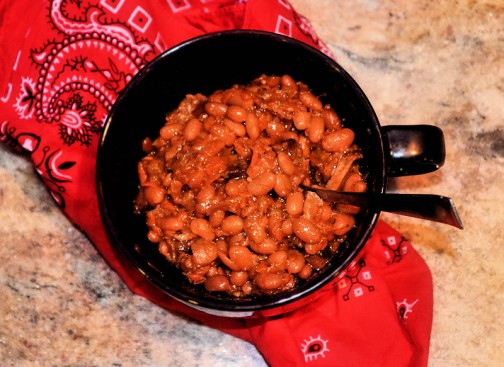
beans01

I am so excited about this recipe!  It’s a paradigm shift recipe!  It’s not a recipe in the true sense of the word, it’s more of a road map to a particular destination.   A road map allows for more flexibility than a recipe, a road map allows the cook to make adjustments based upon personal preferences, taste, time, and what’s in the pantry.  I think most people have a road map for a few good dishes.  I have a road map for spaghetti sauce, chicken soup, stir-fry and hamburgers.  You might have a road map for meatloaf, burritos and rice bowls.  Most people have road maps for sandwiches and salads. A road map means there are guidelines, easy ones, usually ones that can be memorized, and that can always be adapted as the situation requires.

So here it is, a guideline for a pot of beans, in the crockpot no less!  Crockpot cooking is great for summer, the kitchen doesn’t get heated up, and a pot of beans pairs well with almost everything that can be BBQ’d.  In the winter months, a bowl of beans with some cornbread or tortillas is almost the definition of comfort food. Another plus, crockpot cooking is fuss free, so toss everything in the pot and then go sit in the sun or shovel snow.

Many thanks to Mark Bittman of the New York Times for this road map. Thank you, thank you, thank you!!

BTW…, for years I have been looking for a good baked beans recipe, so that’s what I make with this recipe:  meaty, slightly sweet Boston-style beans.  YUM! They go with everything and I have  a serious love for leftover beans on toast (I’m English).  My son mastered this recipe in one take and he makes killer spicy teriyaki beans with chicken.  I can see others going for more of a Mexican style bean. What sort of beans do you like? Make them!

The House Special Beans

  • 1 lb of dried beans, any kind, I like small white and pinquitos but black, pintos, garbanzos, kidney, or a combination of different kinds of beans can also be used.  Don’t have a full pound of beans?  Add in some split peas or lentils to make up the difference.  Remember these are dried beans (about $1.25 for a pound bag) we are not using canned beans here (and there is no need to soak the beans first).
  • 4 cups of liquid, any kind.  Find a mixture that appeals to you. I start with a bottle of beer, then I add in about 1/4 cup of ketchup, 1/4 cup of Worcestershire sauce, 1/4 cup maple syrup, 1/4 cup of brown sugar and a squirt of mustard, using molasses instead of maple syrup and brown sugar would be good too. If my Dad were here I’d stir in 1/4 cup of bourbon. Then I add water, broth (any kind), or cold coffee to make the 4 cups (too much coffee will make the beans a bit bitter, so stick to less than 1 cup of cold coffee).  My son adds BBQ sauce, sriracha, honey, teriyaki or soy sauce along with beer and coffee.  Don’t like beer?  Use some leftover wine. Don’t drink at all, stick to broth and water.   Health nut?  Stir in carrot juice and some of that green liquid you’re so fond of !
  • Seasonings, any kind.  Start with a healthy amount of salt and pepper, then add in what appeals to you.  I add in 2 t. salt, 1 t. black pepper, 1 t. cumin, 2 t. chili powder, minced garlic, and 2 bay leaves.  Other options include oregano, basil, coriander, red pepper, curry powder, ginger, paprika, liquid smoke, parsley, sage, rosemary and thyme…
  • 1 lb meat, any kind, a bit more or a bit less is fine.  I like beef, and I buy something on sale, beef shanks, top sirloin, stew meat, steak, anything.  Throw in a pork chop or two, or some ground meat (brown it first and drain off the fat), chicken (with or without the bones, but boneless chicken does tend to get a bit overcooked), sausage, ham, cooked bacon…, or go for a combo.  Sausage and chicken? Beef and bacon? Or leave out the meat all together if  you’d rather.
  • 2 lbs finely minced or grated veggies, any kind.  I always add diced onion, grated carrots, and minced celery.  Then I might add some shredded zucchini, turnip, cabbage, spinach or kale, whatever I have on hand. Throw in some potatoes. Lots of folk like bell peppers, dice some up and throw them in.  Leeks are yummy. A few diced jalapenos would spice things up. Even canned pumpkin works. The only veggie I don’t add is tomatoes. I heard once that tomatoes interfere with the cooking process of dried beans, so I leave them out (I also don’t use tomato juice as a liquid, but I do stir in a bit of ketchup, and have had no problem with that).

Directions:

  1. Put the dried beans in the bottom of the crock-pot.
  2. Get out a 4-cup measure.  Combine your liquids.  When you have 4 cups, pour it over the beans in the bottom of the crock-pot.
  3. On top of the beans and liquid, add the meat.  I add the meat as is, then remove the fat and bones, and shred the meat after cooking.  You can do the same, or you can add cubes of boneless, skinless meat.
  4. Sprinkle desired seasonings on top of the meat.  (If you add bay leaves, count them so you know how many to remove before serving!)
  5. Finely mince, dice, or shred the veggies.  Add the veggies on top of the meat. (The liquid will not cover the veggies, yet).
  6. With a spatula or a spoon, press on the ingredients to lightly pack.
  7. Put the lid on the slow cooker, plug it in, turn on high, and go out and play! If you are around, check the beans after a few hours.  If the beans look dry add a bit more water, stock, beer, or wine (don’t stir, just pour it on top).
  8. Let beans cook for 6-8 hours.  Turn off.
  9. After the beans have cooled for a bit, taste them.  Needs more salt?  More maple syrup? More heat? Add it now.  If you added large hunks of meat with bones, remove bones and shred the meat. Remove the bay leaves, if you used them.
  10. If you want to add in extras, do it now.  You could stir in some diced tomatoes now, if you’d like, they won’t do any harm at this point (let cook for an additional 30 minutes or so).  Sometimes I stir cooked bacon at this point.  You could stir in frozen corn, if you’d like. Adding chopped parsley, cilantro, or green onion makes the beans look pretty and brightens them up a bit for a pretty presentation.
  11. Remember, beans seem to taste better the day after they are made, so don’t be afraid of letting them rest in the refrigerator for a bit.

Soooo, do you have the road map memorized?  1 lb beans, 1 lb meat, 2 lbs veggies, 1 qt (4 cups) liquid. Seasonings. Crock-pot. High. 6-8 hours, while you go out and play 🙂

Thanks for stopping by my kitchen today!  Go ahead now, make some beans! Let me know what you used and how they turn out 🙂 I can’t stop my son from making these beans! We’re drowning in beans…, but we’re not broke! Beans we can afford 🙂

11 Feb 2013 Gunpowder Polly’s Wild West Cowboy Steak

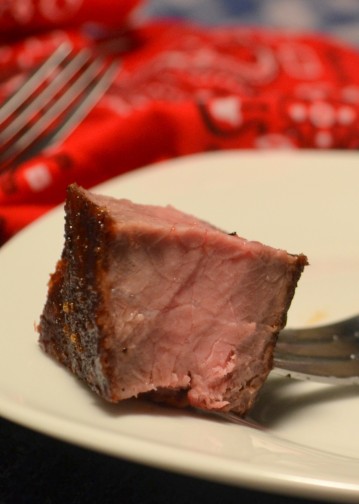
cowboy steak bite on fork 2

Last weekend I had a Wild West themed party at my house.  I suggested to my friends that they come dressed as cowgirls, and they did!  They moseyed on over to the Bar –the Trail Mix Bar– to fill their saddlebags with snacks and quenched their thirst at the watering hole.  I wanted the dinner to be Wild West themed, too, and steak immediately jumped to mind as the perfect main dish (I was later to find out that cowboys rarely ate steak, oops!).  Nevertheless, before steak enlightenment,  I set out to find out how to cook steak for twelve, quickly, accurately and indoors in February!  It was easier than I ever imagined, and more successful, too. After steak enlightenment, I was so excited about this easy, easy way to cook delicious steak that I decided to put it on my Wild West menu anyway.  I also served BBQ drumsticks, onion rings, cornbread with a delicious maple-orange butter, and roasted veggies.  OK, so the menu wasn’t exactly authentic, but it did have a Wild West feel to it 🙂 Also, in preparation for this Wild West dinner, I made place mats out of old blue jeans and bought red bandannas to use as napkins!

Now, for the steak.  Buy some really thick steaks.  I used rib-eyes, but any kind is fine as long as the steaks are thick…, over one-inch thick!  When you get the steaks home, dry age them.  This is a crucial step so buy the steaks early in the week.  Take the plastic wrap off the steaks, place them on a rack, and set them in the refrigerator, uncovered, for up to five days.  That’s right, put the steaks on a (baking) rack (with a tray underneath) in the refrigerator, uncovered, for a few days.  THIS, my friend, is the first half of the equation of a delicious steak.  The second half of the equation is the cooking method in the recipe below. This recipe includes the Cowboy Steak rub I used on my steaks, but you can use any favorite rub, it’s the dry-aging process and cooking process that are important.

For most cowboys,  even for the heartiest meat lovers, one-half of a thick rib steak is probably a good serving size.  I served my cowgirls one-third of a steak each. So with that in mind, your 4 thick steaks, with side dishes, will serve 4 football players, 8 men/boys, or 12 lightweights/small women/teenage girls.

Gunpowder Polly’s Wild West Cowboy Steaks  

(cooked in a modern indoor kitchen)

  • 2 teaspoons kosher salt
  • 1 teaspoon black pepper
  • 1 teaspoon Hungarian sweet paprika (regular or smoked paprika can be substituted)
  • 1 teaspoon garlic powder (can substitute onion powder, if you don’t have garlic powder)
  • 1 teaspoon favorite dried herb, many people like thyme, I prefer basil, some like oregano…put in what you like
  • 1 teaspoon ground cumin
  • ½ teaspoon smoked ancho chili powder (or any other chili powder)
  • 1 teaspoon finely ground coffee beans
  • 4 thick bone-in rib eye steaks ( 1 ¼” to 1 ½ thick; each steak weighing 12 to 16 ounces)
  1. Buy your steaks and dry age them in the refrigerator for up to five days.  Remove the steaks from the package.  Place them on a rack.  Place a tray under the rack to catch any possible drips.  Place the steaks, rack and tray in the refrigerator, uncovered, for up to 5 days.
  2. One or two hours before you want to start cooking, remove steaks from refrigerator and bring to room temperature.
  3. Mix  all rub ingredients –salt, pepper, paprika, garlic powder, dried green herb, cumin, chili powder, and ground coffee– in small bowl. Sprinkle approx ½ teaspoon of rub mixture over each side of the steaks, press and rub mixture into meat. Let steaks stand at room temperature 1 hour.
  4. Preheat the oven to 425°.
  5. Get out an oven safe frying pan large enough to fit all steaks (or use two frying pans), put 1T-3T olive oil in the bottom of the frying pan/s and heat (on the stove) until the oil is smoking (but don’t let the oil burn) and the pan is very, very hot.
  6. Keep heat under the pan on high, or medium high if there appears to be imminent danger of fire, and add the steaks to the hot pan.  Do not touch the steaks for the next five minutes.  Let steak cook on high for exactly five minutes.
  7. Turn the heat off.  Quickly turn the steaks over.  Place the still hot pan–with the steaks still in it–into a hot oven. Close the oven door and set the timer for five minutes.
  8. Remove the steaks and pan from the hot oven. Transfer the steaks to a cutting board, cover lightly with foil, and let sit for ten minutes before cutting or serving.
  9. Serve!  You’ll be amazed at how easy it was to cook the perfect medium rare steak.  Your guests will love, love, love the texture and  taste of the steak.  Look at THIS!

My daughter made these delightful cookies for dessert, so fun and tasty! Check her out at Party Girl Cookies or on Facebook 🙂

Here are a few more pictures from my Wild West party, yeeeeHAW!

Thanks for stopping by my Wild West kitchen today!  I hope this recipe becomes a staple in your kitchen, it definitely has in mine 🙂

20 Apr 2012 Ham Bone Bean Soup

I love Honeybaked ham.  Love it, love it, love it; but have you heard the definition of eternity? Two people and a ham!  Thank goodness I have a panini press for grilled ham and Swiss sandwiches.  Thank goodness I know how to make and enjoy ham and pineapple pizza. Finally, the last of the ham appeared, the bone,  and now it’s time for Ham Bone Soup.

I could NOT find a recipe on the Internet that I liked.  I knowwww, shocking!  So I took a bit from this and a bit from that and came up with this recipe.  It tastes good,  looks good, and is fibrously good for you with lentils, split peas, yellow peas, 4 kinds of beans, tomatoes, onions, celery and carrots plus chicken broth and ham broth. The spices came from a soup on the Honeybaked Ham website, cinnamon, cumin and thyme. I knowwww, sounds odd, but it’s what gives this soup it’s depth.

Enjoy.  (BTW, The new definition of eternity?  One person and a vat of Ham Bone Soup!) This makes a LOT of soup, about 6 quarts. “Fortunately” a friend of mine broke her ankle, so I was able to take one-third of it over to her.  Now I  should check my Facebook to see if anyone has had a baby lately*

Ham Bone Bean Soup

  • 4 cups chopped ham from the ham bone
  • one ham bone plus assorted root veggies and peelings, covered with water
  • 1/4 cup lentils
  • 1/4 cup split peas
  • 1/4 cup yellow peas
  • 2-3 cups water
  • 1 large onion, diced ( approx. 2 cups)
  • 2 tablespoons olive oil (approx.)
  • 2 cups diced celery (include some leaves)
  • 1 leek sliced
  • 4-5 carrots, peeled and sliced (about 2 cups)
  • 28 oz. can crushed tomatoes
  • 3-4 quarts broth (mixture of ham bone broth and chicken broth)
  • 1 tsp. dried thyme
  • 1 teaspoon cumin
  • 1/2 teaspoon cinnamon
  • 2 bay leaves
  • 1/2  teaspoon black pepper
  • salt, to taste (depends on saltiness of chicken broth) maybe about 1 teaspoonful
  • 4 or 5 16 oz. cans beans (use your favorites, of course)  I used 2 cans white beans plus one can each black beans, pinto beans, and pinquito beans (all my favorites)
  1.  First off, cut the meat off the hambone, so that you have 4 cups diced ham, set aside.
  2. Now make some stock from the ham bone. Put the ham bone in a large pot, cover with water and add a whole quartered onion (peel and all), a handful of carrots (or the peelings), some coarsely chopped celery, and any other extra veggie you have on hand.  Bring the mixture to a boil and then simmer for 4 hours.  When cooked, strain the broth. Discard the bone and veggies.  Keep the broth. (The broth can be made one or two days in advance, just refrigerate cooled broth until ready to use)
  3. In another pan, boil the lentils, split peas, and yellow peas (or all lentils, or all split peas) in about 2 cups of water until very soft, about 45 minutes.  Add more water to pan if necessary.  Let cool, and then blend into a liquid.  This puree will thicken the soup (and hide the “icky dried stuff” from picky family members).
  4. Heat olive oil in a large skillet.  Add in chopped onion.  Gently sautee until onion is cooked through and slightly caramelized.  Stir in chopped celery and sliced leek, saute for an additional 3 minutes or so.
  5. In a large soup pot, pour in the ham bone broth and enough chicken broth to equal about 3 quarts.  Stir in crushed tomatoes and lentil/split pea puree and spices (cinnamon, cumin, thyme, bay leaves, salt and pepper). Bring to a boil. Stir in carrots. Simmer until carrots are almost tender, about 20-30 minutes.
  6. Drain and rise the canned beans.  Add to simmering broth.  If soup seems too thick, stir in up to one additional quart of chicken broth.  Simmer for an additional 30 minutes.  Remove bay leaves.  Let soup cool, then refrigerate overnight (if possible, soup always tastes better if refrigerated overnight).
  7. When ready to serve, reheat soup, add diced ham, and simmer for an additional 15 minutes.  Taste broth.  If necessary add more salt, pepper, and cinnamon.  Serve hot with some nice bread, foccacia, or cornbread.

Hope you like this. Hope it was just the soup you were looking for but couldn’t find anywhere else on the Internet.

*Update:  Woke this morning to find the empty soup pot on the kitchen counter and three dirty soup bowls stacked in the sink along and dredges of sourdough toast everywhere.   Looks like my son and two friends had a late night snack after I went to bed.  They emptied the pan; there’s no more Ham Bone Soup left.  Should I put a happy face icon after this update, or a sad face icon?!

Thanks for stopping by my kitchen today!